Real-time communication with Giraffe and Fabulous
Real-time communication can make any application that much more interactive. Whether it be a simple chat application, or other notifications that are pushed live to the client, there is a significant improvement in the user experience when this information is pushed in real-time to the client without the need for a page refresh, or specifically having to pull this data. In many user facing applications, this is usually accomplished using WebSocket protocol. And in the .Net space, the dominant library for WebSocket support is SignalR. SignalR provides a number of advantages over directly using WebSockets, because it provides several features on top. Some of these features include improved connection management (e.g. how to handle reconnecting), sending messages to all or only some clients, and built-in scaling. Additionally, SignalR can automatically fallback to Server-sent events or Long-Polling depending on what the client supports.
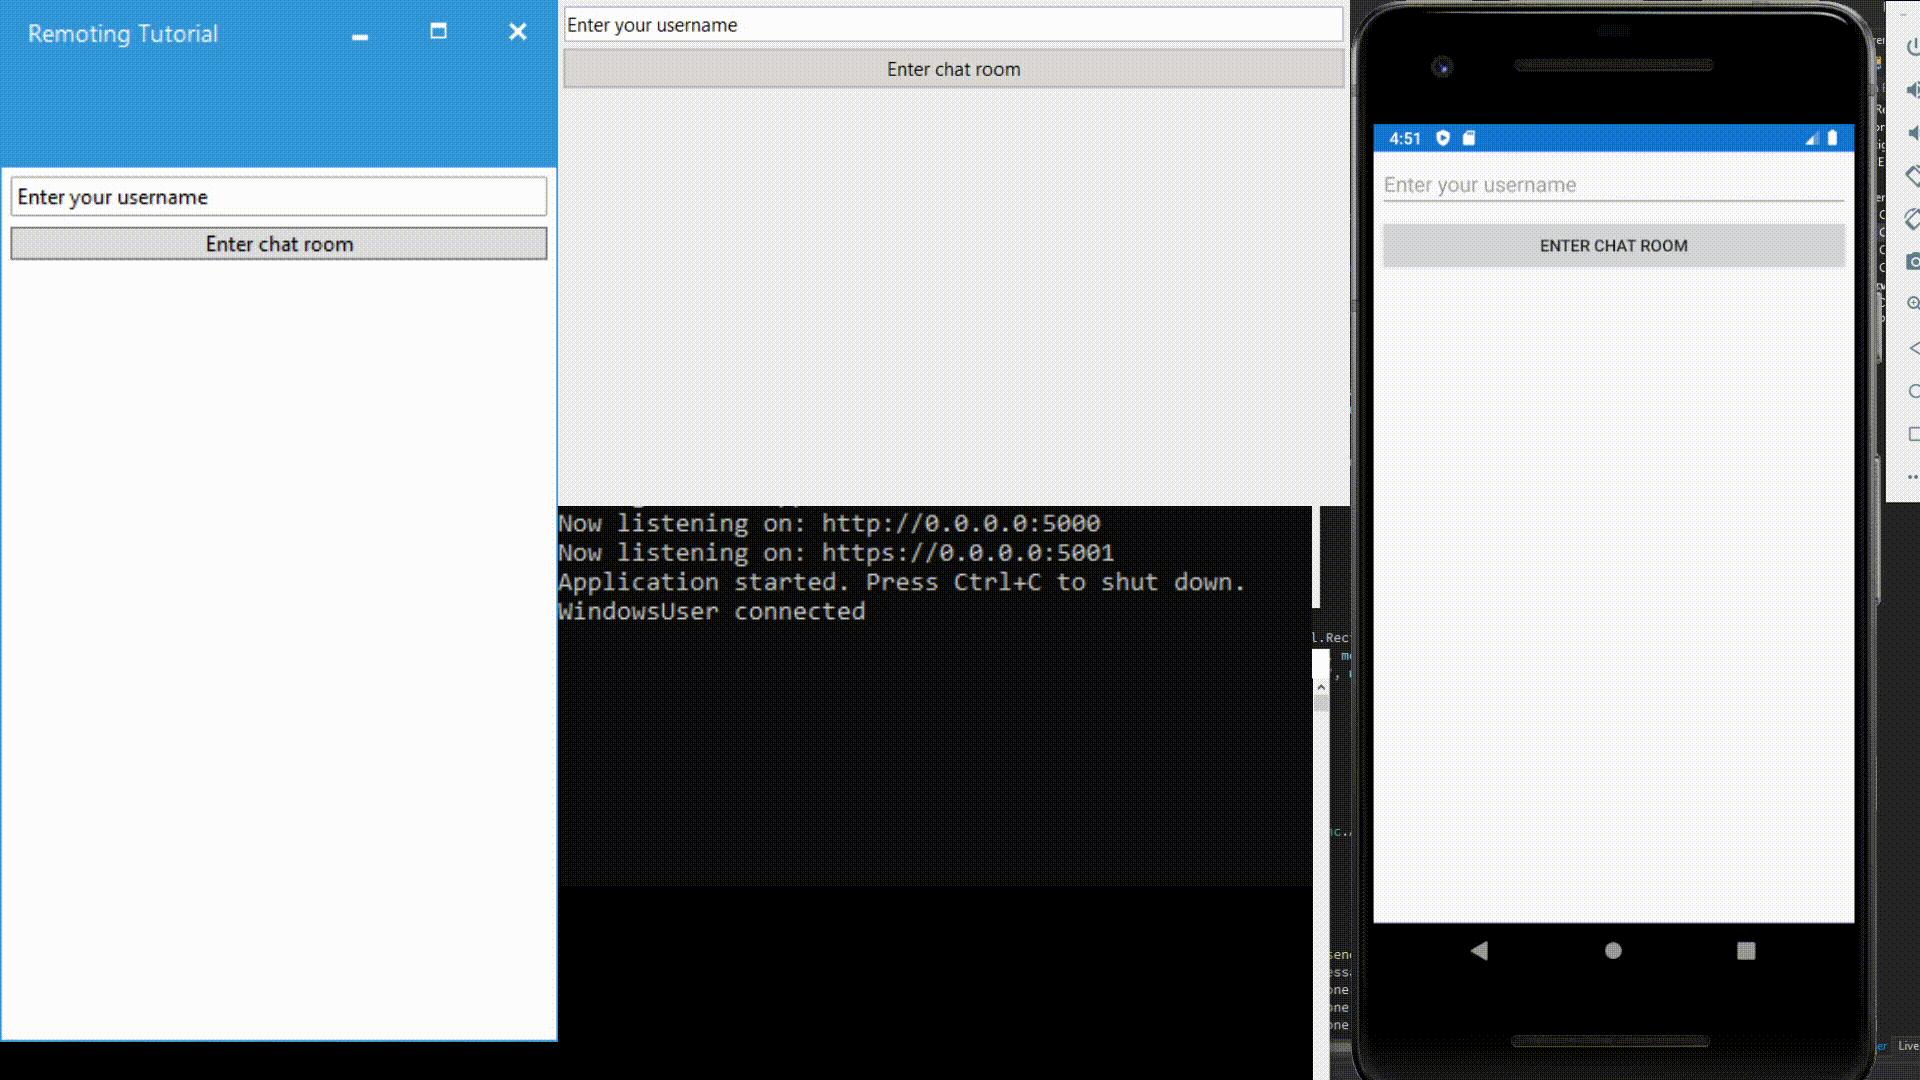
SignalR was originally written with web applications in mind, however a generic .Net client now also exists. This allows us to leverage the power of SignalR from applications such as WPF or Xamarin.Forms, or in our case Fabulous, the F# MVU framework for creating Xamarin.Forms applications. We are also going to be using Giraffe as our backend to facilitate the communication between our various frontend clients. As is the case with any introductory tutorial regarding WebSockets, we are going to be building a simple chat application where a single codebase will allow us to create clients for Android, WPF, and GTK. In the end, this is what it will look like:
Setup of the project
Source code for this post available here:
- https://github.com/kaeedo/FabulousSignalRTutorial
- https://codeberg.org/CubeOfShame/FabulousSignalRTutorial
In this post, I'm going to assume that you know how to get started with Fabulous, and have all clients you want already setup. But disclaimer where disclaimer is due: In my codebase, my clients are setup as C# projects instead of the F# ones that the Fabulous template comes with, as I personally always seem to have problems getting those running. Your mileage may vary. However, all the C# projects do is call into the shared F# Fabulous library. Along with that, my GTK client in the Demo.gif is running on Windows, not on Linux. However it should work just the same.
Additionally, I won't be talking about how best to use SignalR, or how to setup and use the hubs. This post is mainly about how to integrate it into an F# codebase as all tutorials I've found on the subject are all in C#. The biggest difference is obviously the paradigm, as SignalR is implemented in C# and designed to be consumed in an object oriented manner. So the question becomes, how do we integrate this to be more functional and idiomatic F#. Along with that, within our Fabulous project, we need to integrate the WebSocket calls and listeners into the Elmish lifecycle.
The Server
The setup of the server is actually rather simple because Giraffe is built on top of ASP.NET Core, and SignalR plugs into it the same as any other middleware. We'll need only one NuGet package, which is Microsoft.AspNetCore.SignalR.Core. Once we have that, we need to add SignalR into the pipeline like this:
let configureApp (app : IApplicationBuilder) =
    // Needed together with endpoints
    app.UseRouting() |> ignore
    app.UseEndpoints(fun endpoints ->
        endpoints.MapHub<ChatHub>("/chathub") |> ignore
    ) |> ignore

    app.UseGiraffe webApp
This adds the ChatHub to the SignalR middleware, which itself is added as a service like this:
let configureServices (services : IServiceCollection) =
    services.AddGiraffe() |> ignore
    services.AddSignalR() |> ignore
And that's practically the only configuration needed to add SignalR to a Giraffe application. Now you can create any number of SignalR Hubs and add them using MapHub the same as the chat hub. Since F# is a multi-paradigm language, we can create the necessary classes that inherit from Hub the way SignalR expects us to. Here's the definition of the ChatHub:
type ChatHub(connectedUsers: Dictionary<string, string>) =
    inherit Hub()

    member __.SendMessageToAll(message: string) =
        printfn "Sending \"%s\" to all connected clients" message
        __.Clients.All.SendAsync("ReceiveMessage", message) |> Async.AwaitTask |> Async.RunSynchronously

    member __.SendMessageToUser(user: string, message: string) =
        printfn "Sending \"%s\" to \"%s\"" message user
        let caller =
            connectedUsers.Keys.Where(fun k -> connectedUsers.[k] = __.Context.ConnectionId).First()

        let clientId = connectedUsers.[user]
        __.Clients.Client(clientId).SendAsync("ReceiveDirectMessage", caller, message) |> Async.AwaitTask |> Async.RunSynchronously

    member __.ClientConnected(username: string) =
        printfn "%s connected" username
        connectedUsers.[username] <- __.Context.ConnectionId

        let allParticipants = connectedUsers.Keys.ToList()

        __.Clients.All.SendAsync("ParticipantConnected", allParticipants)  |> Async.AwaitTask |> Async.RunSynchronously
Ignore the injected dictionary for now, I'll talk about that more later. The important part in this class is that we're extending a Hub, which gives us access to all the WebSocket goodies, as well as the connection management from SignalR itself. We create any methods we want the clients to call on our class. This is the point where I personally encountered some confusion in how it's supposed to work. These method names are used as magic string by the client, and then SignalR will find the appropriate method to call in our hub that the client is connected to. For example: The client application calls ChatHub.InvokeAsync("SendMessageToAll", "My text to send to the server"). The first parameter is the magic string that gets mapped to the appropriate hub method with the same name. The second parameter in the client call is serialized, and then automagicall deserialized on the server side as the first argument to the method. See the diagram below for a visual aid.
The other important thing to keep in mind is that SendAsync is exactly that: Async. So we need to make sure to await it in some way, so that we can ensure that the call went out before the class gets destroyed. In my case, I just wait for it synchronously. Keep in mind that instances of this hub are transient, meaning that for each call to the hub a new one gets created. This is important to note for state management. SignalR has its own connection management, but you need to bring your own application state management. This is also the reason why we're injecting a Dictionaryinto the class. In this particular example, the dictionary is registered as a singleton in the ConfigureServices of the Giraffe application, but any "real" project will need something more robust.
The Clients
This is the where power of Xamarin.Forms shines, and especially with community support, we can create a number of different clients with a single codebase. In this example we have a single shared library that contains the UI and logic code, and three client applications that serve as their respective entry points. There is a project for Anrdoid, WPF, and GTK. It's also possible to create clients for UWP and iOS. This allows us to write our logic once, and run everywhere. The fun part now, is to integrate the SignalR client into the elmish lifecycle of Fabulous.
To start, we need to add the Microsoft.AspNetCore.SignalR.Clientpackage in our shared project. After that, the tricky bit is starting a persistent WebSocket connection with listeneres, and giving the listeners access to the dispatch function of elmish. So, the first thing we need to do is build a client hub that connects to the server. There are two ways we can do this. On app start, or after a user action, such as "logging in". In the sample application, this happens after the user enters a username and "navigates" to the chat room.
The client hub
To make sure that all parts of the elmish application have access to the hub, I opted to add the hub to the global model:
type Model =
  { // Other model properties
    ChatHub: HubConnection option }
It's an Option type, because we won't always have an active hub connection in all parts of the application. Alternatively, the hub can be built within the initModel function. Starting the hub can also be done at a different point in time. This is also a good moment to make sure to disconnect from the hub when it's not needed anymore. This is especially important for mobile clients to save on data costs and battery drain. The code to build the hub and add it to our model looks something like this:
let update msg model =
    match msg with
    | EnterChatRoom ->
        let hub =
            HubConnectionBuilder()
                .WithUrl("http://{ip address of server}:5000/chathub")
                .WithAutomaticReconnect()
                .Build()

         hub.StartAsync() |> ignore

         let cmds =
            Cmd.batch [
                Cmd.ofSub (fun (dispatch: Msg -> unit) -> setupListeners dispatch hub)
                setConnectedCmd hub model.Username
            ]

        { model with ChatHub = Some hub }, cmds
    | // OtherMessageHandlers -> model, Cmd.none
There's several things happening here. First, we build the hub connection using a HubConnectionBuilder and feeding it the server IP Address and other configuration options.
Side note: when developing locally, using localhostis common, but this won't work if your client application is a mobile device, as localhost would refer to the mobile device itself within the emulator. Addtionally, you might run into problems with invalid SSL certificates for the self signed ASP.NET Core dev certificate, or if you're using an unsecured connection, the connection might be blocked by the security manager. There are several workarounds for this and a great guide for android specifically here: https://nicksnettravels.builttoroam.com/android-certificates/ .
After the the HubConnection is built, we need to start it. As mentioned previously, we aren't requried to do it at the same time as the Hub builder, but in this particular sample application, we will. This is the call that will actually make the connection to the backend. After this part, we're ready to start sending and receiving messages from the backend. At this point we just need to setup some listeners that have access to the elmish dispatchfunction. This is what the first of the two Cmd is doing. The second is an async command that sends a message to the server about who just connected. The necesseity of this depends entirely on what you're trying to accomplish.
We can pass the dispatch function to any arbitrary function by wrapping it in a Cmd.ofSub, which allows us to dispatch elmish messages from anywhere we like. You can read up more on elmish commands in the fantastic elmish book. The book is meant for Fable.Elmish, the one that's meant to be used in websites, but the concepts are the same in Fabulous.
Listening for messages from the WebSocket connection
As previously mentioned, we need to setup listeners that react when a message is sent from the backend. The code for those looks like this:
let setupListeners (dispatch: Msg -> unit) (hub: HubConnection) =
    hub.On<string>("ReceiveMessage", fun message ->
        dispatch <| ReceivedMessage message
    ) |> ignore

    hub.On<string, string>("ReceiveDirectMessage", fun sender message ->
        dispatch <| ReceivedMessage (sprintf "%s whispered: %s" sender message)
    ) |> ignore

    hub.On<System.Collections.Generic.List<string>>("ParticipantConnected", fun participants ->
        let participants = participants |> List.ofSeq
        dispatch <| ParticipantConnected participants
    ) |> ignore
We use the hub.On generic method, which takes the types of the parameters passed from the backend as its generic arguments. The first parameter is the magic string name that corresponds to the magic string in the backend when the server sends a message to the clients. The second parameter is a function with number of arguments equal to number of type arguments specified for the generic. These map one to one. This is the function that gets called anytime a message of the specified name is sent from the backend. Here is where we can take the data sent from the server, and then call the dispatch function to update our UI with the elmish loop.
SignalR by default serializes the data to JSON, however it also has built in support for MessagePack. Important to note, is that because SignalR was designed to be used from C#, the types that the client hub expects are the C# versions. What this means in practice, is that when listening for messages that sends a list across, you must listen on the C# System.Collections.Generic.List<T> instead of the F# Microsoft.FSharp.Collections.FSharpList<T>.
Sending messages to the server
Sending a message to the server using our hub connection is rather easy. It's not much different from any HTTP call.
let sendMessageCmd (model: Model) =
    async {
        do! model.ChatHub.Value.InvokeAsync("SendMessageToAll", model.EntryText) |> Async.AwaitTask
        return NoOp
    }
    |> Cmd.ofAsyncMsg
We use the InvokeAsync method on the hub that we have stored in the elmish model. This is a fire and forget situation, but returns a Task and can optionally take a CancellationToken. We must then wrap it as an Async.Cmd That we can return from our updated function. It's as simple as | SendMessage -> { model with EntryText = String.Empty }, (sendMessageCmd model)
So all things considered, integrating SignalR into a fabulous application is relatively simple. The most annoying part for is the usage of the magic strings, but there are several options there. For starters, the server side hub can take a generic interface, which gives us specific interface methods to send messages to, but on the client side we would still be listening on magic strings. Another option would be to use the latest preview features of F#, which has a nameof operator akin to C#. Another option would be to use something like Fable.SignalR, which is an F# wrapper library around SignalR made by the amazing Shmew. Join me next time as I explore using Fable.SignalR.