Protect your ASP.NET site using Supabase authentication
Now that the pendulum is slowly swinging back towards classic plain HTML web servers, we can also simplify our authentication strategies. It's time to go old school again, and build a plain old ASP.NET MVC site using server side razor as our view engine. It's going to contain a very basic set of pages, and navigation links that change based on whether the user is logged in or not. We're going to use Supabase Auth to handle all the actual identity management, as well as providing us with the E-Mail verification functionality.
Reason being is that authentication is one of those parts of an application that should ideally never be implemented from scratch, just because it's a complicated process, and any mistakes lead to a massive breach of security and trust. That's why we're going to rely on an external party where one of their main focuses is providing authentication as a service.
Source code on Coderberg and on GitHub
Supabase
Supabase is an entire BaaS (backend as a service), that focuses on using PostgreSQL Row Level Security to provide a full fledged backend including edge functions, auth, and cloud storage, among other things. However, one of the nice things about Supabase is that you can use only the parts that interest you. In fact, this blog utilizes Supabase as just a simple PostgreSQL database with a standard connection string, and uses Supabase auth to let only me upload and edit posts.
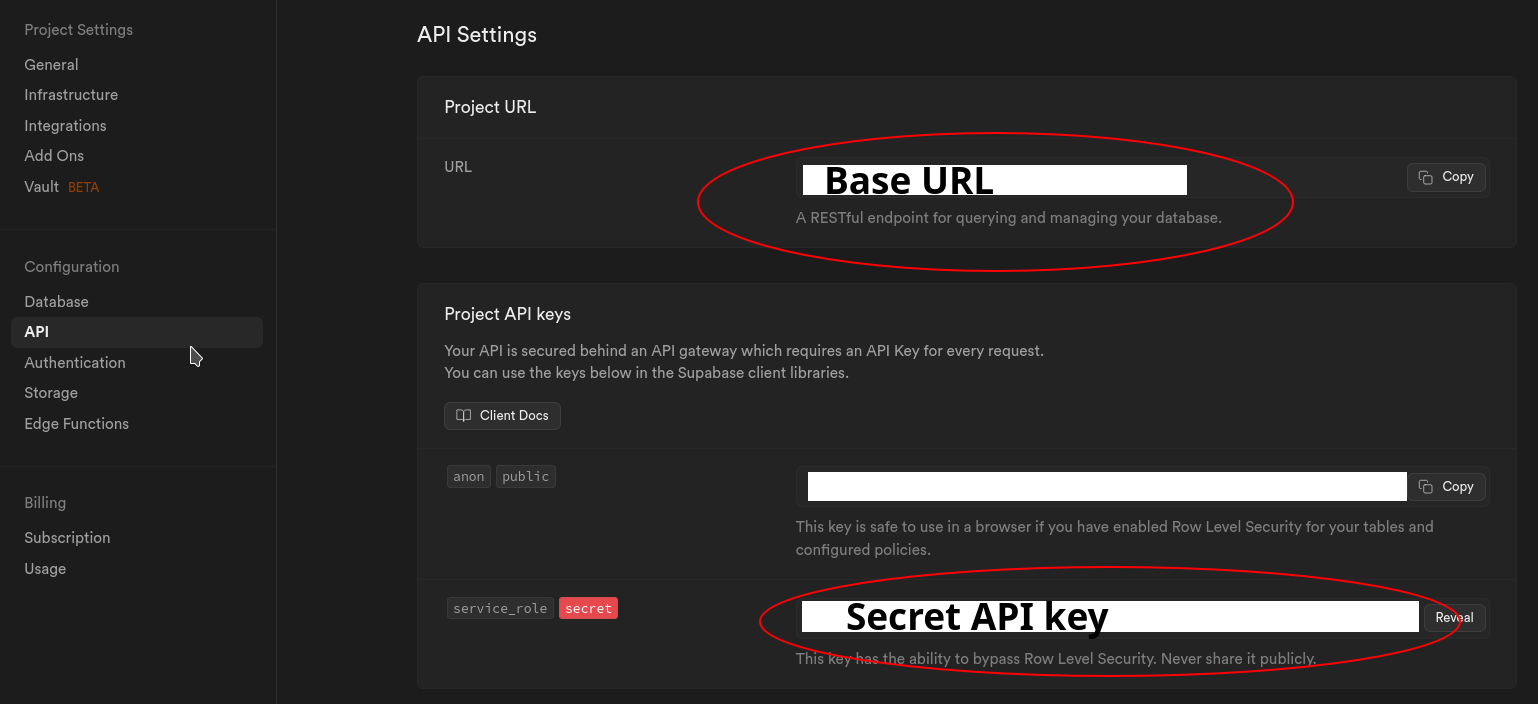
To get started, create a new Supabase project. You can use all the default values. You will only need two things for your application: The base URL, and the Secrete API key. Be careful with your secret API key, and never expose it to clients, and use it only in your server side logic.
All the default value in the authentication section are also sufficient. It allows user sign up via E-mail, and also requires the user to click a verification link in the E-mail after sign up.
The Web Server
The web server is a basic ASP.Net MVC site, utilizing .cshtml razor as the view engine. It includes some small helpers such as a live reload plugin, as well as precompiling them a Release build. But we're only really interested in how the authentication is setup. The most important thing is that we want to utilize the ASP.Net mechanisms such as the Authentication and Authorization middlewares since the entire ecosystem relies on those APIs. This means we need to somehow connect the Supabase auth to the ASP.Net UserClaims. This is accomplished across the Supabase.Client nuget, and two services in the codebase: CustomAuthStateProvider.fs and AuthService.fs.
Supbase.Client
This NuGet package provides a wrapper around the Supabase API, and allows us to use the Auth functions that Supabase offers. We're interested in the client.Auth.SignUp(email, password, options) and the client.Auth.SignIn(email, password) functions. When performing an authentication action with the Supabase client, we receive a JWT token as a response. This is good, as it means that we successfully authenticated, but it's not enough for ASP.Net. That's where the next service comes into play.
Custom Auth State Provider
This service handles all the logic required to convert JWT token to a ClaimsPrincipal that's required by the ASP.Net middleware. The core logic is as follows:
let parseBase64WithoutPadding (base64: string) =
    match base64.Length % 4 with
    | 2 -> Convert.FromBase64String(base64 + "==")
    | 3 -> Convert.FromBase64String(base64 + "=")
    | _ -> Convert.FromBase64String(base64)

let parseClaimsFromJwt (jwt: string) =
    let payload = jwt.Split('.')[1]
    let jsonBytes = parseBase64WithoutPadding payload
    let kvp = JsonSerializer.Deserialize<Dictionary<string, obj>>(jsonBytes)

    kvp.Select(fun kv -> Claim(kv.Key, kv.Value.ToString()))

let identity = ClaimsIdentity(parseClaimsFromJwt (client.Auth.CurrentSession.AccessToken), "jwt")
let principal = ClaimsPrincipal(identity)
Check here for the full implementation. The basic idea is to acquire the JWT from the injected Supabase client, and then parse it and then construct and instance of a ClaimsIdentity. This will allow us to actually use the constructed ClaimsPrincipal within the AuthService
AuthService
The AuthService is the actual service that is used by the various controllers to sign up or sign in. All it really does is ensure that the Supabase client and Custom Auth State provider are used in conjuction. However, it also contains the single most important line of code for the entire flow. The Custom Auth State Provider provides a correctly constructed ClaimsPrincipal but we still need to persist that in a client browser Cookie. This is done on the HttpContext within the auth service with the following call: accessor.HttpContext.SignInAsync(CookieAuthenticationDefaults.AuthenticationScheme, authState.User). For the longest time I wasn't able to find any information on how to actually construct and persist a ClaimsPrincipal, as all other authentication tutorials I could find always relied on whatever service they were using, and having their client library manage all the magic. But none of them showed the very simple call to HttpContext.SignIn. Once I learned about this, authentication in general seemed so much simpler. The gist of it is as follows:
member _.SignIn(email: string, password: string) =
    task {
        let! _ = client.Auth.SignIn(email, password)
        let! authState = customAuthStateProvider.GetAuthenticationStateAsync()

        do! accessor.HttpContext.SignInAsync(CookieAuthenticationDefaults.AuthenticationScheme, authState.User)

        return ()
    }
The rest of the web server is simply wiring up the various endpoints with sign in/sign up, or logout functionality, and being able to check the HttpContext.User.IsAuthenticated, as well as reading any other information on the user.
E-Mail verification
The other fun part that Supabase provides out of the box is an E-Mail verification. This means that whenever a new user signs up, they must first confirm that they control the E-Mail address that they provided. It's basic spam protection. This E-Mail is sent out by Supabase, and contains a link back to Supabase which sets a flag confirming the E-Mail address. This link also contains a return URL to redirect the user back to your site after confirmation. The configuration of the E-Mail template, as well as the redirect URL are managed within the Supabase dashboard:
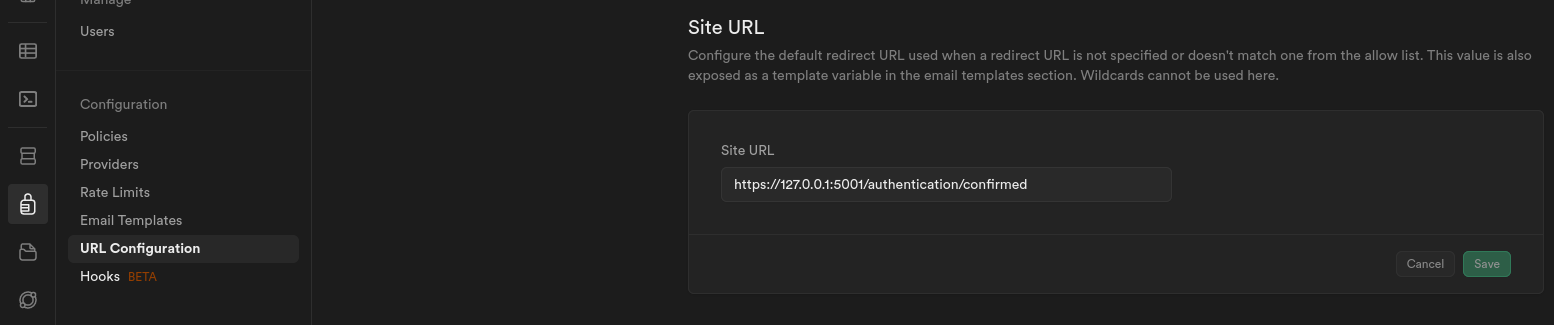
It's important that the SiteURL is the one that contains the URL of the page that you want your user to land on. Theoretically, this can be configured from the actual Supabase.Client library within your application, but, as of writing, it doesn't seem to be working as there were a bunch of issues by various people online asking about how to get this to function as expected. If you know how to get this working, please let me know on Mastodon at @kaeedo@mstdn.social.
GDPR
Do I need a GDPR Cookie Banner? NO . This is because the usage of these cookies is required for basic functionality of the website. Cookie banners are only required for optional cookies.